Unfortunately, few of us (users) arrange preventive repairs and periodic maintenance of household appliances. As a rule, we use the device until something falls off ... Am I right? I would be glad if you, my dear readers, are not such slobs as I am :)
Today we will talk about my washing machine, which ... 18 years old! During this time, the bearings on the drum were changed (1 time), the control board and the door lock were repaired. Not so many breakdowns for such a decent age!!!
Now, it's time to run my hands to the drain pump. He stopped working.
As it was: during the next wash, when the machine set out to drain the water, somewhere inside there was a terrible sound “Tyk-tyk-tyn-dyk-fluff”. And silence….
I could only hear the buzz of either a transformer (which is not in my typewriter), or an electric motor with a jammed shaft. I had to drain the water on the floor ... hand-to-hand rinse and wring out the laundry. Well, drag out the washer to the operational space for subsequent diagnostics.
The whole repair process was filmed and published on my YouTube channel. The link to the video is at the end of the article.
This stage is shown in the photo below:
As you can see, I have already removed the back wall.
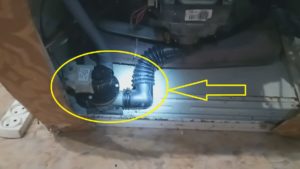
The drain pump is located at the lowest point of the front panel of the washer (photo below).
Having studied the tag on its case, I found out that it is powered by an alternating voltage of 220 volts (well, what else will be here).
Therefore, I decided to apply a working voltage to it in order to listen to how it behaves. To do this, I threw back the power connector and powered it with jumpers from carrying.
Result: buzzing windings without any sign of shaft rotation. Well, that's not bad either! So the winding is alive!!!
Now you need to disassemble the patient. To do this, unscrew 3 screws. In some designs, instead of latch screws.
The top of the pump is easy to remove. It is enough to pry with a screwdriver. But be prepared for the remaining water to splash onto the floor. Stock up on rags.
Now we need to separate the rotor part of the electric motor from the main body. Again, your flathead screwdriver will come in handy. Pry lightly at the spot shown in the photo below.
The rotor part may resist a little due to sticking of the magnet with the magnetic circuit, and also if the nylon plain bearing sits securely in its grooves.
And so, before us appeared such a picture: all the insides are filled with some kind of nasty substance. There is so much of it that it did not allow the shaft to rotate freely.
We remove as much as possible all the dirt and ... fill everything with vinegar. For a day.
A day later, washing from the remnants of dirt, I saw an almost perfect picture.
There is a little scum left on this part. But ... nevertheless, I consider the result positive.
I'm putting together a pump.
After assembly, before installation in the machine, I test by applying voltage to the pump terminals.
Oh miracle!!! Works!!!! Saved a thousand rubles!!! Where would you spend them now?
After returning the pump to its rightful place, the machine began to work as expected.
But ... I saw that it was time to change the bearings on the drum. But that's another story.
My typewriter is called Indesit. But similar actions will be relevant on other washing machines. The principle is the same!
Thanks for the like, subscribe and nice words of encouragement!
And here is the promised video :