Today I want to share with you the technology of installing a concrete floor on the ground in the bathroom. These works were carried out 10 years ago and now, after such a significant period of time, I can recommend this particular technique.
So…
The work was carried out in a private house built in the late 90s. When installing the floor, the previous owner made some mistakes that led to the fact that the concrete floor simply began to burst in several places.
In addition, in winter, it was so cold from the floor that not only barefoot ... in slippers my feet were freezing ...
The two photos below show the original state of the bathroom.
Removed bathtub, toilet, sink, pump station and 500 liter tank.
The concrete floor had to be removed completely and deepened into the ground.
From the intended zero point, it was necessary to go deeper by 35-40 cm.
In the photo below - the space where the bath and sink were located.
There was a toilet here. Additionally made a drain for the bidet.
The hardest job was knocking the tiles off the walls. The tiles were glass. She held on very tightly.
Without a perforator, I would have had a hard time at all. Fragments of breaking tiles now and then dug into open areas of the body. Therefore, I had to dress in tight clothes, despite the fact that it was 40 degrees outside (summer 2010).
When the ground was removed and the tiles removed, the construction of the floor began.
The first layer is rubble. Layer thickness - 10 cm.
To compact the rubble, from what was at hand, I made just such a "crush".
On top of the rubble, he poured sand. Also 10 centimeters.
Rammed the same "crush". In order to compact the sand as much as possible, the sand was poured several times with water.
Sand with crushed stone should be compacted as much as possible so that voids do not form later.
On top of the sand he laid a polyethylene film, 200 microns thick - in 2 layers.
Film - for waterproofing.
In addition, the film should be slightly on the walls. Literally 10-15 cm.
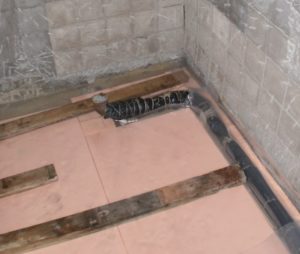
A dense extruded polystyrene was laid on top of the film.
The thickness of these plates is 3 cm.
On top of the polystyrene again put the film. In one layer.
This could not have been done. It is enough that lies on top of the sand. I just had an extra film left - so I applied it for reliability.
The next layer is concrete. Unfortunately, for some reason I did not have photos of this layer. Although I took a picture ... Strange ...
Well then, in words, I’ll tell you about the concrete recipe for the floor on the ground:
Concrete was prepared according to the following recipe: 1 part cement grade 500 + 2.5 parts sand + 5 parts crushed stone.
Filling thickness - 10 cm. Filling had to be done in one day. I didn’t have an assistant, so in order to be in time, I started work from the very early morning.
To withstand the same thickness of the concrete cushion, I made several beacons from boards 10 cm wide. I put them on edge, and filled them with concrete, from time to time leveling the rule so that everything was on the same level.
At the end of the pour, he pulled out the boards from the uncured concrete and filled the resulting space with liquid concrete.
Concrete cured for 3 weeks. In the morning, at lunchtime and in the evening, I watered the concrete with water - a couple of buckets left.
After 3 weeks, laid the floor tiles:
Satisfied with the result. The floor became much warmer.
Most of all, I was worried about that part of the floor where I have a 500-liter tank and a pumping station. Will it sell? However, 10 years have passed - everything is wonderful ...